


Essential Guide to Terratrip Tripmeters
If you’re passionate about rally driving or just need a reliable device for precise navigation, the Terratrip tripmeter is an excellent choice. This versatile tool measures distance and speed, helping you keep track of your progress with pinpoint accuracy. Whether you’re a professional rally driver or a road trip enthusiast, the Terratrip ensures that you never lose track of your journey.
In this guide, we’ll walk you through everything you need to know about fitting, operating, and maintaining your Terratrip tripmeter. From installation to troubleshooting, we’ll cover all aspects to ensure that you get the most out of your device. Let’s dive into how you can get started with your tripmeter and enhance your driving experience.
1. Installation and Setup: A Simple Guide to Getting Started
Proper installation is crucial for ensuring that yourTerratrip tripmete functions accurately. Here’s how to do it step by step:
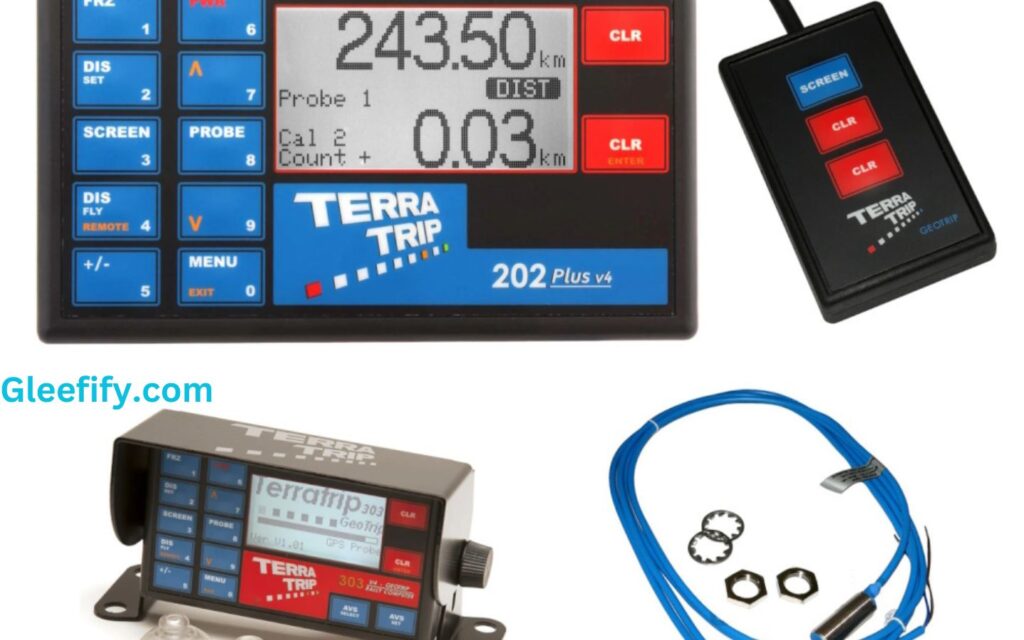
Step 1: Install the Probe and Rally Computer
Begin by mounting the probe to your car’s wheel assembly. Ensure that the probe is clear of any electrical circuits, including ignition and alternator cables. The probe will detect the rotation of the wheels and send signals to the rally computer to track your distance and speed.
- Tip: Mount the rally computer in a spot that is easily accessible for quick adjustments while driving.
Step 2: Test the Probe
After installing the probe, you’ll need to verify that it’s working. Simply drive your car for a short distance and check whether the rally computer is counting the distance traveled. This ensures that the probe is correctly connected and functional.
Step 3: Calibrate the System
Calibration is essential for accurate distance readings. You’ll need to choose between miles or kilometers, depending on your location. The system should then be calibrated to your car’s specifications, which is crucial for ensuring that the measurements are precise.
Important Reminder: Avoid opening the tripmeter yourself. If you experience any issues, it’s always best to contact Terratrip customer support for assistance.
2. Operating the Terratrip Tripmeter: Key Features and Functions
Once your Terratrip tripmeter is installed and calibrated, it’s time to operate it. Here’s how to use it effectively:
Speed and Distance Display
The T 202 Plus model features a user-friendly setup that displays both speed and total distance. You can toggle between these two views by pressing the SPD button on the tripmeter. This feature is perfect for drivers who want to monitor both their current speed and the total distance they have covered.
Resetting Data
To reset all data, including time and distance, simply press and hold the “0” button for three seconds. This allows you to start fresh if needed.
Pro Tip: The tripmeter will retain important information such as the time of day, stopwatch settings, and total distance even when powered off. This means you don’t have to re-enter data each time you use it.
Distance and Time Controls
The Terratrip tripmeter also allows you to adjust the total distance and interval distance. Use the +/- buttons to adjust these values, and if you want to freeze the distance temporarily, just press the FRZ button.
TSD Mode: If you’re participating in time-speed-distance (TSD) events, the tripmeter is equipped with a TSD mode to track your performance.
3. Fitting the Probe: A Detailed Step-by-Step Guide
For accurate measurements, it’s vital that the probe is positioned correctly. Follow these steps for optimal placement:
Positioning the Probe
- The probe should be aimed at the bolt heads securing the brake disc to a non-driven wheel.
- Ensure the probe is co-axial with the bolt center, and the face of the probe is parallel to the bolt heads.
Key Considerations
- Protect the Probe Cable: To avoid damage from stones and debris, cover the probe cable with protective tubing.
- Tighten Locknuts Carefully: When securing the probe, be sure not to over-tighten the locknuts. This could damage the probe.
- Check Connections: Always verify the connections before powering up the system to avoid installation issues.
4. Calibration: Ensuring Accurate Readings
Calibration ensures that your Terratrip tripmeter gives precise readings. Here’s how to calibrate it:
Step-by-Step Calibration
- Enter Calibration Mode: Use the F and S buttons to adjust the calibration settings.
- Drive a Known Distance: Drive your car over a known distance (1 mile or 1 kilometer), and note the interval reading displayed on the tripmeter.
- Adjust Calibration: Return to calibration mode and set the calibration number to match the interval distance displayed.
- Exit Calibration Mode: Once the values are adjusted, exit the calibration mode to finalize the settings.
5. Electrical Connections: Powering Up Your Tripmeter
The Terratrip tripmeter runs on a 12V electrical system. Proper installation of the power connections is essential for avoiding electrical issues.
Fuse Protection
- Always fuse the power supply at no more than 2 amps to prevent damage from electrical surges.
Negative and Positive Earth Systems
- The Terratrip 1 model works with negative earth systems, while the newer models (202/303) can accommodate both negative and positive earth systems.
6. Maintenance: Keeping Your Terratrip Tripmeter in Top Shape
To ensure the longevity of your Terratrip tripmeter, regular maintenance is key. Here are a few tips for keeping it in perfect working condition:
Cable and Probe Care
- Ensure that cables are free from damage and interference, especially from your car’s ignition system. High-quality shielded cables can help minimize electrical interference.
Regular Testing
- Test the voltage across the probe terminals regularly to ensure proper functionality. If you experience faulty readings, the probe may need to be replaced.
Cleaning the Display
- Keep the LCD display clean using an anti-static cloth to maintain clear visibility. Avoid using harsh chemicals or cleaning agents directly on the screen.
7. Troubleshooting Tips: Fixing Common Issues
If your Terratrip tripmeter is malfunctioning, the issue is often electrical interference, especially from spark plug leads or ignition coils. Here’s what you can do:
Check for Interference
- Use shielded cables to minimize interference from electrical components in your car.
- If the display freezes, turn off the device, wait for a few seconds, and then restart the system.
Conclusion: Maximize Your Driving Experience with the Terratrip Tripmeter
The Terratrip tripmeter is an indispensable tool for anyone who values accurate distance and speed readings, whether you’re navigating a rally course or embarking on a long road trip. By following the installation, calibration, and maintenance tips provided in this guide, you can ensure that your tripmeter performs reliably for years to come.
If you need further assistance, don’t hesitate to reach out to Terratrip customer support. Enjoy your journeys with the peace of mind that comes with knowing your distance and speed are being tracked with precision!

1 Comment
Pingback: PrintXP Computer Requirements for DTF Printing in 2025 - Gleefify